Tuesday, February 14, 2012

Bathroom Break

My in-laws are finishing up an awesome remodel on their home with the bathrooms being the last step. They are going to have a men's and a women's bathroom right next to each other, so my mother-in-law asked me to make door signs. She didn't want them to be super obvious by just saying "Men" and "Women," so we decided shoes would be cute. The general idea could be used in other areas too such as a girl's room or wherever you want! Just change the framed item to match the space/decor. Here is what I did:

I found a pair of frames at an antique mall with a picture inside that I didn't feel bad (at all) about ripping out. They were $6.95 each, which seemed pretty cheap since they are matted and everything.
.

For the men's room, I chose a boot and printed out a side view picture from the internet.


A heel was an obvious choice for the women's room. I found a silhouette and printed that as well. As you can see, my lazy way of stenciling the image onto my choice of paper is to go over and over the outline with a Sharpie until it bleeds through. Pretty inventive, huh...


I used a textured, corduroy type paper for the boot with a brown for the sole. I found some tiny gold rings in the jewelry section at Joann's (I have no idea what they're for), and glued them onto the paper. Then I poked holes through them and weaved in some thin ribbon for the shoestrings.


The heel was a lot more simple. At the end I added a black puff of tulle to the top to give it more detail. I wish this shoe were real and I had somewhere to wear it.


I bought a couple plastic mirror sheets and cool cut out paper. I glued the paper on top of the mirror, then the shoes on top of the paper, and closed it all up.


Yay!

-kt

What You Chalkin About?

Ever since we moved into our apartment, I've been trying out ways to cover up our cheap, ugly kitchen cabinets. This post is about my latest endeavor...chalkboards!


I put one on each of the three upper cabinet doors on one side of our kitchen. They do a pretty good job of covering the doors and add a fun element..and polka dots. I thought they might be fun for children too if placed on the bottom cabinets. The chalkboards would keep the kids occupied while Mom (...or Dad) cooks dinner, etc. Here is how I made them:


I bought a set of 3 canvases from Hobby Lobby and black chalkboard paint from Joann's. The paint directions say to do two coats, but I had to do more like four to get total coverage. Once you are done painting, you have to wait twenty-four hours before you can use them. It was the longest day of my life...


After the paint was completely dry, I staple gunned some ribbon to the back of the boards, and that was it!


Oh no!
Not!

After I stopped crying...just kidding...I realized I had enough ribbon to wrap around the top and cover the project ruining staple meanies. 


And then I ran out of ribbon to fully cover the last one, but didn't want to buy any more, so too bad. 


To attach them to the cabinets, I hammered a nail into the inside of the cabinet door. Think the landlords will notice? Oh well. I think our wallpaper will probably be more of a concern...


Done! They are pretty easy and cost me about $15 to make. That's cheap for all of their great uses...

Grocery lists

Museum quality self-portraits


Party guest fun


Love notes

And wishing your best friend a happy birthday!
-kt

Wednesday, January 18, 2012

Party Animal Hemp Necklaces!


Adorable animals in party hats, guaranteed to cheer you up even if you are sick as hell! I found these little gems at Michael’s in the clearance bin for 49 cents. Mine! After that I picked up some hemp string, picked out colors from my embroidery thread, and found the clear casting epoxy (also thanks to Michael's).

So the first thing I did was create three basic hemp necklaces. The project was more about learning to use the epoxy, so I kept it simple. Here’s the standard hemp knots:


1. Follow color coated string placement
2. Repeat alternating sides.

This is what you ended on and
takes the place of the green
in the other drawing.


I chose a color for each necklace that fit with the animal. Then after realizing the threads tangled ridiculously, and spending way too much time unknotting, I tied them up except for a couple inches of working string. The first necklace turned out a bit wonky, but after a while I realized to look for the large knot and take the string from that side first. This worked much better than relying on my shady memory.

Interestingly enough the hardest part of this process was finding the right size molds. I came across some plastic cases for tea lights that were just the right size. I will never use these again. It might have been my refusal to by the $11 dollar lube, but I'm a lady. Anyways I ended up prying out the beads with pliers and got a gnarly blister. I’m getting ahead of myself. The clear epoxy is super simple. Measure out equal amounts of both mixtures, pour, and don’t get it in your eyes. I let the beads dry for 24 hours and then start the extraction process mentioned above. I’m looking for rubber molds next time.


Awe

Rawr!
To finish up the beads I sanded down the rough edges around the top. I really didn’t have any buffing options, so I carefully used fine sand paper. I drilled a mostly straight hole through the top of the beads then used a needle to thread the bead. Then I ran the string through the hemp necklace to attach the bead. Altogether this project cost me about $20. The epoxy was a tad expensive, but I only used about a fourth of a bottle. Plus I have an extra cute T-Rex bead. 

Pretty classy work station!

This project was a decent learning experience. I'd say it was a solid first attempt with the epoxy. I'm thinking about expanding into medallions made from fabrics. Might be kind of cute. As long as I can find rubber molds.

-Aubs


Sunday, January 8, 2012

Holly Jolly January

Sorry about the little hiatus we've been on. I haven't been too motivated recently, but here are some gift ideas under $10...three weeks after Christmas. My family hasn't gotten their gifts from me yet, so it still counts. You should probably get started on your list for this Christmas now anyway. Remember how stressed you were a few of weeks ago?

Personalized Wreaths

My mom's Christmas list included three things that were supposed to suffice for three daughters and our dad. The gifts were bought before I even saw the list, so I was left with no ideas. This is usually how it goes. And she wonders why her husband got her a flat screen tv one year...
 
Merry Christmas, Mom!

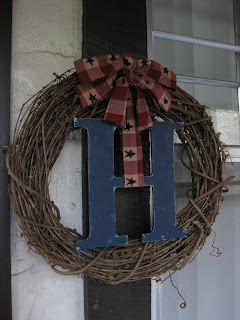
She loves the American antique style, so I thought up this personalized wreath. I got everything from Hobby Lobby and with sales and coupons, it only cost $6 to make!

Wreath  $2.99 after a 40% off coupon
Letter $1.39 after a 30% off sale
1/4 yard of fabric $1.22 after a 30% off sale


The picture pretty much speaks for itself, but I'll explain how I completed the wreath. I decided to make my grandma one too, so I'll show you the process for hers.

Letter

I painted the letter with a tan base coat so that when I did the distressing, there would be color underneath. I propped the 'F' up on an old bowl, which made painting the sides a lot easier. Unbeknownst to me, this was my husband's "favorite cereal bowl!" Okay...sorry, it was ugly.


Next I painted on the red. After that dried, I started the distressing and realized I didn't have any sandpaper. I tried using a Brillo pad for a while, but that didn't really work. Then my husband suggested an emery board...what a good idea! It worked and was way easier to maneuver. I also used a flathead screwdriver to nick up the surface a little. Ruining something you just worked on for an hour is fun yet terrifying...
Bow

I folded the 1/4 yard of fabric in half lengthwise and then cut down the fold to make two pieces. Then I pinned one short end to the other and sewed them together to form one long piece. Bear helped, as usual. Ugh.

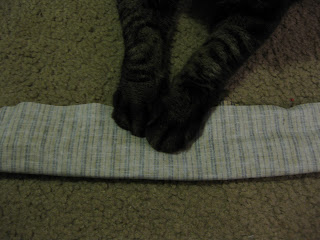
I folded the now long piece in half lengthwise, right sides together, and pinned the raw edges. You can also use nature's pins...cat paws! 
Then I sewed the edges together and turned the tube right side out...the most annoying part.

To form the bow, I tied one regular bow and was left with two long tails. I tied another bow with those to create a double bow.

I then folded the tails' raw edges under to sew the openings closed...but I didn't want to take the bow apart, so I just used hot glue...shhhh.

Done!


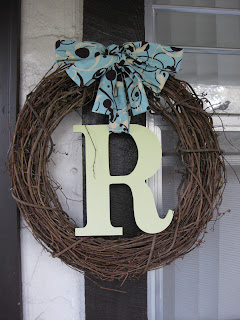
If the antique look isn't your thing, I also tried a more modern style for my mother-in-law.

Merry Christmas, Annette!
Beer Cutezies

Why??

Phew! Much better.

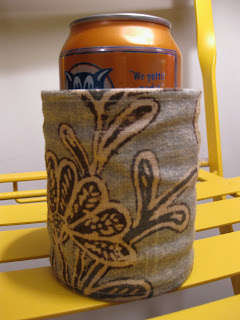
I don't know how beer koozies turned into the tackiest thing ever, but we don't have to stand for it anymore! No one needs a koozie that says "Old Fart's Beer" and when you're spending the night drinking PBR you definitely need some added class to cool your brew. 

These could potentially be free if you have any koozies lying around and a small fabric scrap. We, surprisingly, did not have any koozies, so I bought these for $1. Here's how they're done...

Cut out a 5" x 12" piece of fabric. (Thanks for my new fancy scissors, Margie and Erin!)

Next, fold down 1/2" from the top and bottom raw edges. I made a little template out of a greeting card that was 4" wide and used an iron so that I could get a clean and straight edge. Pin the edges down.

Sew along the pinned edges. Choose one of the short raw edges to pin and sew down too as it will be visible on the koozie.


 Using hot glue, glue down the raw edge onto the koozie. Place the glue along the folded edges so that any globs aren't as noticable. Then glue the finished edge over the raw edge.


(I forgot to show this step for the plaid one. Oh well, you get to see another koozie begging for a shirt).

Scholary beer koozie. 
Super classy. And smart.

I also made a personalized koozie. I cut a stencil out of paper and filled it in with paint (very surprisingly it didn't bleed).

Hands off my drink!


Fabric Bead Necklaces


The only thing I had to buy for these was wooden balls. The original tutorial I saw used wooden beads, but I couldn't find any at Hobby Lobby. These were $2.99, but 30% off, so the bag came to about $2.09. I can make five necklaces with two bags, so one necklace only costs me 83 cents.

First, cut out a 4.5" x 40" piece of fabric, fold the right sides together lengthwise, pin, and sew along the raw edges.

Turn the fabric rightside out...the most annoying part again. Now you have a tube.
Make a knot at one end, leaving a small opening for the ribbon.

After the first knot, drop in a ball or bead, and then tie another knot. Repeat this until you have just a small piece left on the other side. I usually use about eight balls. I made this necklace with upholstery fabric so the knots turned out a little thicker than I wanted. I prefer the look of the black and white one because I used a thin fabric.

Next you'll have to mess around with the length and see how long you'd like your necklace. I cut my two pieces of ribbon 21" each. You need them long enough to tie a bow. Turn the raw edges under and insert the ribbon. Pin the opening closed and sew everything together. And you're done! I made a couple for my sisters for Christmas...in time for Christmas. They're fun to make because they are easily personalized...and cheap!

I hope everyone had a great holiday season!
Bear and I are looking forward to many new crafting adventures in 2012!